Lesser known features
Environment Modules provides many capabilities beyond the commonly used
module load command. Some features are lesser known, despite being very
useful for users, modulefile developers, and site administrators.
This document gathers and explains a selection of these features through practical examples and common use cases.
It originates from the presentation Beyond "module load": Exploring the Capabilities of Environment Modules given at HPSFCon 2026. Original slides and video demonstrations can be found on the event session page.
Short command names
Most Modules sub-commands can be abbreviated. The ml command also provides a shorter alternative interface for common operations.
Standard command |
Short form |
|---|---|
|
|
|
|
|
|
|
|
|
|
|
|
Display/Parsing
--output=LIST
The --output, or -o, option customizes the information
displayed by Modules commands.
It is supported by module avail, list, and
spider sub-commands.
By default, these commands display additional formatting elements such as
modulepaths, tags, default markers, or variant information. With
--output, it is possible to restrict the displayed information to
only the needed fields.
This option is especially useful when parsing command output in shell scripts, Python programs, or monitoring tools.
For example, with the following available modulefiles:
$ module avail
------------------- /usr/share/modulefiles ------------------
gcc/8.3  gcc/11.1  gcc/14.0  openmpi/5.0.8
When LIST is set to an empty value, only module names are displayed:
$ module avail -o ''
gcc/8.3  gcc/11.1  gcc/14.0  openmpi/5.0.8
The output format is defined as a colon-separated list of elements. Supported elements are documented in the corresponding sub-command manual pages.
LIST may also be prefixed by + or - to respectively append elements
to or subtract them from the currently configured value. For example, report
the variants declared by each modulefile in addition to the default output:
$ module avail -o +variant
------------------- /usr/share/modulefiles ------------------
gcc/8.3  gcc/11.1  gcc/14.0  openmpi/5.0.8{cuda=on,off}
This feature helps avoid fragile text parsing pipelines.
Instead of parsing formatted output:
modules_list=$(module avail | grep -v '^---' \
   | sed 's/(default)//g' | head -n -2 | xargs)
A simpler and more robust approach is:
modules_list=$(module avail -o '')
spider
The module spider sub-command lists all available
modulefiles found in enabled modulepaths, including modulepaths recursively
added by modulefiles.
Unlike avail, spider explores the full dependency tree
created by module use, append-path, or
prepend-path instructions.
This command is especially useful with hierarchical module layouts, where some modulefiles only become visible after loading compiler or MPI dependencies.
The spider sub-command accepts the same display and formatting
options as avail, including --output,
--latest, --default, --json,
--indepth, and --no-indepth.
For example, in a hierarchical environment:
$ module avail
------------------- /usr/share/modulefiles/common ------------------
gcc/14.0  intel/25.0
Only compiler modules are initially visible.
The spider sub-command reveals additional modules together with
their dependency path:
$ module spider
------------------- /usr/share/modulefiles/common ------------------
gcc/14.0  intel/25.0


---------- /usr/share/modulefiles/intel (via intel/25.0) -----------
intelmpi/25.0

------------ /usr/share/modulefiles/gcc (via gcc/14.0) -------------
openmpi/5.0.8
This output indicates which modules must be loaded before these MPI stacks become available.
Modules caches are automatically used by spider when configured,
which significantly improves search performance on large installations.
--latest and --default
The --latest, or -L, and --default, or
-d, options restrict the output of the module
avail and spider sub-commands.
For example, with the following available modulefiles:
$ module avail
------------------- /usr/share/modulefiles ------------------
gcc/8.3  gcc/11.1  gcc/14.0  intel/24.0  intel/25.0
The --latest option displays only the highest numerically sorted
version of each module name.
$ module avail --latest
------------------- /usr/share/modulefiles ------------------
gcc/14.0  intel/25.0
The --default option displays only the default version of each
module name. This version is either explicitly defined (as here for gcc)
or implicitly the highest one (as for intel).
$ module avail --default
------------------- /usr/share/modulefiles ------------------
gcc/11.1  intel/25.0
These options may also be combined with other display options such as
--output or --json.
--indepth and --no-indepth
The --indepth and --no-indepth options control how the
module avail and spider sub-commands search
for matching modulefiles.
By default, Modules searches recursively and returns all matching
modulefiles. This behavior is equivalent to --indepth and
can be configured with module config avail_indepth
and spider_indepth.
$ module avail
------------------- /usr/share/modulefiles ------------------
intel/24.0  intel/25.0  gcc/8.3  gcc/11.1  gcc/14.0
The --no-indepth option limits results to the depth level
expressed by the search query. Modulefiles contained in matching directories
are not displayed.
$ module avail --no-indepth
------------------- /usr/share/modulefiles ------------------
intel/  gcc/
--json
The --json, or -j, option displays command results in
JSON format.
It is supported by the module avail, list,
savelist, search, spider,
stashlist, and whatis sub-commands.
JSON output is intended for machine consumption and can be processed directly
by tools such as jq or Python scripts.
$ module avail -j | jq .
{
  "/usr/share/modulefiles": {
    "gcc/14.0": {
      "name": "gcc/14.0",
      "type": "modulefile",
      "symbols": [],
      "tags": [],
      "pathname": "/usr/share/modulefiles/gcc/14.0",
      "via": ""
    },
    ...
}
The JSON format is also useful for monitoring, reporting, and integration with external tools.
Manipulating the environment for users
Collections
Collections save and restore sets of loaded modules.
They provide a convenient way to switch between software environments without having to manually load and unload each module.
Collections are managed through several module sub-commands:
Sub-command |
Description |
|---|---|
|
Save the current module environment to a collection. |
|
Restore a collection or collection file. |
List saved collections. |
|
|
Remove a saved collection. |
|
Display information about a collection. |
|
Test whether one or more collections exist. |
Collections are stored under the user collection directory, usually
$HOME/.module.
The MODULES_COLLECTION_TARGET environment variable may be defined
to append a suffix to collection names. This feature is particularly useful
on systems sharing a common home directory across multiple clusters.
$ module save
$ module purge
$ module restore
stash commands
Stash collections temporarily save the current module environment and make it easy to switch to another environment.
This feature is similar to the git stash workflow: save the current state, perform other work, then restore the original environment later.
Stash collections are managed through several module sub-commands:
Sub-command |
Description |
|---|---|
Save the current environment and reset it. |
|
Restore and remove a stash collection. |
|
Remove a stash collection. |
|
Display information about a stash collection. |
|
Remove all stash collections. |
|
List stash collections. |
Save the current environment:
$ module stash
Load a different software stack:
$ module purge
$ module load ...
Restore the original environment:
$ module stashpop
Unlike regular collections, stash collections are intended to be short-lived
and are automatically removed when restored with
stashpop.
mogui
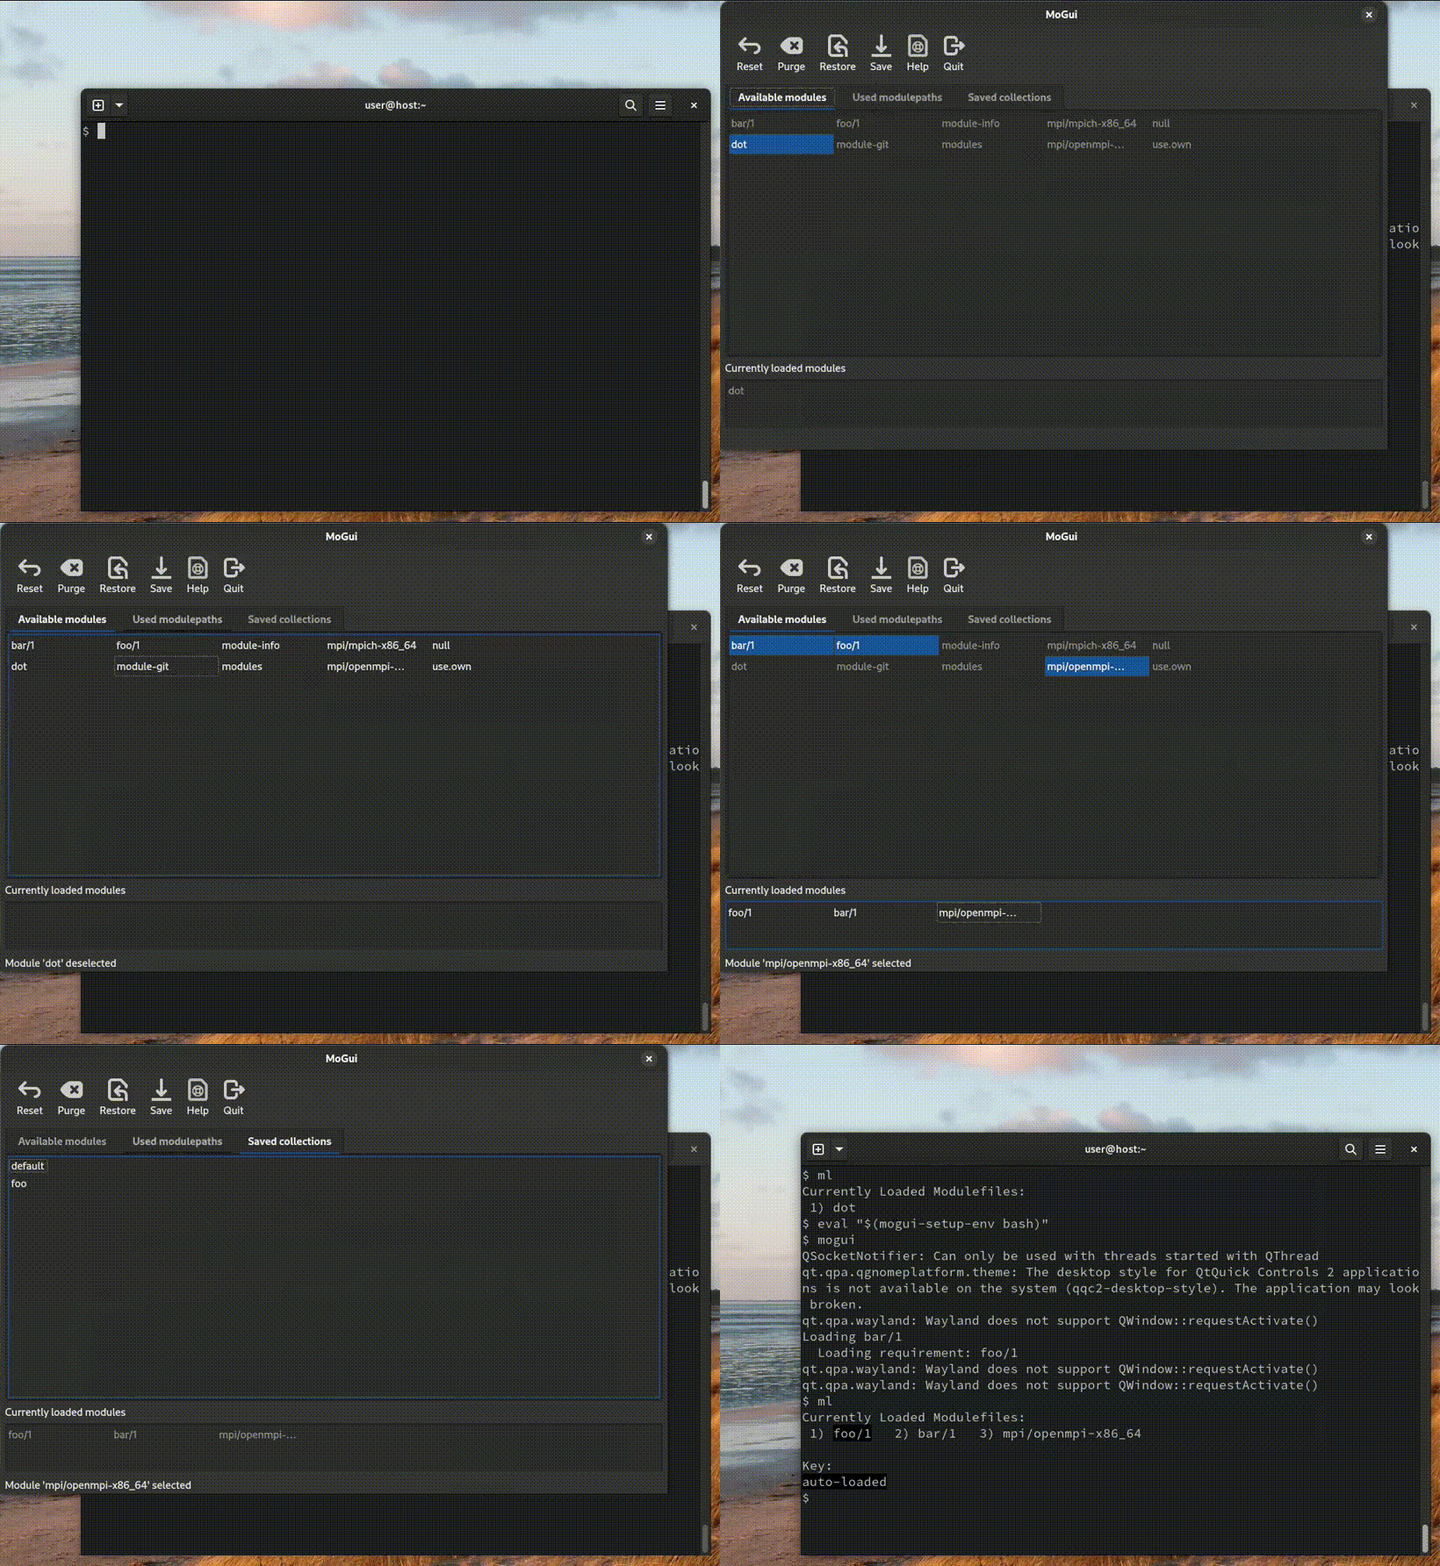
mogui provides a graphical interface to browse available modules and
manage collections.
It offers an alternative to the command line and can be useful for new users discovering a software stack or for users who prefer an interactive interface.
Any environment change made from the GUI, such as loading modules or restoring collections, is applied back to the shell session that launched the application.
The project is available on GitHub: cea-hpc/mogui. It can be installed from PyPI with pip or from Spack.
$ pip install modules-gui
or:
$ spack install py-modules-gui
Then start the graphical interface:
$ mogui
envml
The envml command executes a command in a specific module environment.
It applies the requested module actions, executes the command, then restores the original environment. As a result, the current shell session remains unchanged.
This feature is particularly useful in scripts, tests, and automation workflows where commands must be executed in a controlled software environment.
Supported module actions include:
Action |
Description |
|---|---|
|
Purge all loaded modules. |
|
Restore a saved collection. |
|
Unload one or more modules. |
|
Switch from one module to another. |
|
Load one or more modules. |
|
Shorthand form of |
Multiple actions may be chained with the : separator. When specifying
multiple modules for a single action, use the & separator. In some
shells, such as Bash, the & character must be escaped or quoted.
For example, execute a command in a clean environment:
$ envml purge -- gcc hello.c
The envml command can simplify scripts by replacing sequences of module operations with a single command.
Instead of:
#!/bin/bash
module purge
module load gcc
gcc hello.c
One can write:
#!/bin/bash
envml purge:gcc -- gcc hello.c
Protected environment variables
The protected_envvars configuration option prevents Modules from
modifying selected environment variables. Multiple variables may be specified
using the : separator.
This feature is useful to protect critical environment settings from unintended changes.
When a modulefile attempts to modify a protected variable, Modules ignores the modification and emits a warning.
$ module config protected_envvars LD_PRELOAD
$ module load intel
Loading intel/25.0
  WARNING: Modification of protected environment variable LD_PRELOAD ignored
Developing and configuring modulefiles
module edit
The module edit sub-command opens a modulefile in the
configured text editor (cf. config editor).
Instead of manually locating a modulefile:
$ vi $(module path appA)
One can directly edit it with:
$ module edit appA
module lint
The module lint sub-command analyzes modulefiles and
reports potential issues.
It relies on the Nagelfar Tcl syntax checker to detect syntax errors and common mistakes.
Analyze a specific modulefile:
$ module lint appA
Reported issues may include:
Unknown variables
Unknown commands
Invalid command arguments
Tcl syntax errors
source-sh
The source-sh modulefile command evaluates a shell script and tracks
the environment changes it performs.
The detected changes are translated into modulefile actions, making it possible to load and unload shell-based environments through Modules.
It is particularly useful to integrate software distributions that provide
environment setup scripts such as setup-env.sh, mpivars.sh, or
similar rc-provided files.
For example:
#%Module

source-sh bash /opt/spack/share/spack/setup-env.sh
sh-to-mod
The module sh-to-mod sub-command evaluates a shell script
and reports the resulting environment changes as modulefile commands.
It can be used to convert existing shell initialization scripts into modulefiles.
For example:
$ module sh-to-mod bash setup-env.sh > setup-env.mod
Tip
Use sh-to-mod when you want to generate and maintain a regular
modulefile from an existing shell script.
mod-to-sh
The module mod-to-sh sub-command evaluates one or more
modulefiles and reports the resulting environment changes as shell code.
For example:
$ module mod-to-sh bash appA > setup-env.sh
prereq
The prereq modulefile command declares one or more modules as a
requirement of the current modulefile. When the automated module handling
mode is enabled (see auto_handling), which is the default, a
requirement is automatically loaded if not yet present in the user
environment.
Requirements are sometimes expressed with a condition block:
if { ! [ is-loaded appA ] } {
   module load appA
}
This must be avoided: when appA is already loaded, the condition is
false and no requirement rule is defined, so Modules is not aware that the
current module depends on appA.
Declare the requirement unconditionally instead:
prereq appA
Loading a module declaring this requirement (here appB) automatically
loads the required module when missing:
$ module load appB
Loading appB
  Loading requirement: appA
When automated module handling is disabled, a missing requirement is not automatically loaded: an error is reported and the modulefile load fails.
The module load modulefile command equally declares a
requirement rule, and it loads the missing required module even when
automated module handling is disabled. The two commands also differ when
several modules are specified: module load loads them all
(logical AND) whereas prereq requires only one of them (logical
OR). Multiple prereq commands act as a logical AND.
conflict
The conflict modulefile command declares one or more modules that
cannot be loaded together with the current modulefile.
Instead of manually checking for incompatible modules:
if { [ is-loaded appB ] } {
   puts stderr "ERROR: appB conflicts with appA!"
   exit 1
}
Declare the conflict with:
conflict appB
When the conflict_unload configuration option is enabled in
addition to the automated module handling mode (see auto_handling),
loading a module automatically unloads the conflicting modules found in the
user environment:
$ module load appA
Loading appA
  Unloading conflict: appB
When these options are disabled, an error is reported instead and the modulefile load fails.
A modulefile declaring a conflict on its own module name defines a reflexive conflict: only one version of this module can then be loaded at a time.
conflict appA
$ module load appA/2.0
Loading appA/2.0
  Unloading conflict: appA/1.0
Tip
When only one module should be loaded at a time for any given module
name, enable the unique_name_loaded configuration option
instead of declaring a reflexive conflict in every modulefile. As this
option applies to all existing modules, every module name must follow
this rule. It is generally the case when only application modules are
provided, but may not be if application configurations are also handled
through modulefiles.
variant
The variant modulefile command declares variants and their accepted
values.
This command is only available inside modulefiles.
Variants allow users to customize the behavior of a modulefile at load time. They follow the same syntax as Spack variants.
Boolean variants are enabled with + and disabled with ~:
#%Module
variant --boolean cuda
$ module load openmpi +cuda
Variants with multiple values are declared by listing the accepted values:
#%Module
variant compiler gcc intel
And selected with the = syntax:
$ module load openmpi compiler=intel
The getvariant modulefile command retrieves the value of a declared
variant, allowing the modulefile to adapt its behavior.
For example:
switch -- [getvariant compiler] {
   gcc {
      prereq gcc
   }
   intel {
      prereq intel
   }
}
Configuration option variant_shortcut defines shortcut characters
for variants.
For example:
$ module config variant_shortcut compiler=%
This allows users to write:
$ module load openmpi %gcc
Advanced manipulations
Advanced module version specifiers
Advanced module version specifiers provide a concise way to select modulefiles based on
their version or declared variants. They can be used with several
module sub-commands, including avail,
spider, load, and switch.
Version specifications use the @ character:
Specification |
Description |
|---|---|
|
Select the default version. |
|
Select the latest version. |
|
Select versions greater than or equal to |
|
Select versions lower than or equal to |
|
Select versions between |
Variant specifications may also be used:
Specification |
Description |
|---|---|
|
Select modules declaring the |
|
Select modules where the |
|
Select modules matching both variant requirements. |
--timer and --debug
The --timer and --debug, or -D, options help
analyze and troubleshoot Modules commands.
They are supported by most module sub-commands.
The --timer option reports the total execution time of a command.
For example:
$ module avail --timer
------------------- /usr/share/modulefiles ------------------
gcc/8.3  gcc/11.1  gcc/14.0  openmpi/5.0.8

TIMER Total execution took 20.045 ms
The --debug, or -D, option displays debugging messages
describing the internal execution of the command.
For example:
$ module avail -D
DEBUG setState: cmdline set to 'modulecmd.tcl bash avail -D'
DEBUG setState: shell set to 'bash'
DEBUG setState: subcmd set to 'avail'
DEBUG setConf: verbosity set to 'debug'
...
------------------- /usr/share/modulefiles ------------------
gcc/8.3  gcc/11.1  gcc/14.0  openmpi/5.0.8
The --timer and --debug options may be combined. In this
case, regular debug messages are replaced by execution time reports for each
internal procedure call.
$ module avail --timer -D
TIMER parseModuleCommandName avail help (0.151 ms)
TIMER isIcase (0.088 ms)
TIMER defineModStartNbProc 1 (0.060 ms)
...
TIMER Total execution took 31.722 ms
For even more detailed debugging information, use -DD.
.modulerc files
A .modulerc file contains Tcl code automatically evaluated by
Modules when encountered during a command execution.
Rc files are used to define module aliases, virtual modules, tags, hidden modules, forbidden modules, ...
Several .modulerc files may be evaluated during a single
module command.
Depending on the executed sub-command, Modules may evaluate
.modulerc files found in different locations, including:
$HOME/.modulercModulepath and modules directories
For example, the following directory hierarchy contains several
.modulerc files:
/home/user/.modulerc
modulefiles/
├── .modulerc
├── app/
│   ├── .modulerc
│   └── 1.0
└── mpi/
    ├── .modulerc
    └── openmpi/5.0
Depending on the requested operation, one or more of these files are evaluated automatically.
See Modulecmd startup for details on the startup sequence,
rcfile and ignore_user_rc to configure the evaluation
of user rc files, and modulerc_extra_vars and
modulerc_extra_cmds to extend .modulerc files.
module-tag
The module-tag modulerc command associates one or more tags with
modulefiles.
This command is only available inside .modulerc files.
Tags may be used to provide additional information about modulefiles or to modify their behavior.
For example:
module-tag experimental app/2.0
The tag is then reported along the module name in search results:
$ module avail
------------------- /usr/share/modulefiles ------------------
app/1.0  app/2.0 <experimental>
Several predefined tags affect the behavior of Modules:
Tag |
Description |
|---|---|
|
Prevent automatic unloading when unloading dependent modules. |
|
Prevent unloading unless |
|
Prevent unloading under any circumstances. |
For example:
module-tag sticky core
Once loaded, the core module cannot be unloaded, even with the
purge sub-command. The sticky tag is rendered with a specific
background color in the output.
$ module purge
Unloading core/1.0
  ERROR: Unload of sticky module skipped
$ module list
Currently Loaded Modulefiles:
 1) core/1.0
Sticky modules can help ensure that essential software stacks remain loaded.
The behavior of purge with sticky modules can be configured through
sticky_purge.
module-hide
The module-hide modulerc command hides modulefiles from module
searches and selection.
This command is only available inside .modulerc files.
A hidden module is excluded from regular searches but may still be selected when explicitly referred to by its exact name.
For example:
module-hide app/1.0
Visibility may also be restricted to specific users or groups.
Time-based restrictions can be defined with --after and --before.
For example:
module-hide --after 2027-01-01 app/1.0
See module-hide for additional visibility options, including soft
and hard hiding, as well as users and groups restrictions.
module-forbid
The module-forbid modulerc command prevents designated modulefiles
from being loaded.
This command is only available inside .modulerc files.
Unlike a hidden module, a forbidden module remains visible in module searches but cannot be loaded.
For example:
module-forbid app/1.0
A custom message may be displayed when a user attempts to load a forbidden
module with the --message option.
For example:
module-forbid --message {Please use app/2.0 instead} app/1.0
See module-forbid for additional restriction options, including
custom messages, as well as after/before, users and groups restrictions.
module-virtual
The module-virtual modulerc command associates a virtual module name
with an existing modulefile.
This command is only available inside .modulerc files.
Several virtual modules may refer to the same modulefile, reducing the number of files required to define similar modules.
For example:
modulefiles/app/
├── .common
└── .modulerc
The .modulerc file may define several virtual versions:
#%Module
module-virtual 1.0 .common
module-virtual 1.2 .common
module-virtual 1.5 .common
module-virtual 2.0 .common
$ module avail
------------------- /usr/share/modulefiles ------------------
app/1.0  app/1.2  app/1.5  app/2.0
All these virtual modules are evaluated using the same .common
modulefile.
Its behavior can be adapted according to the virtual module
name being evaluated.
#%Module

set version [lindex [split [module-info name] /] end]

setenv APP_VERSION $version
Module logger
Modules can log module activity through the logger and
logged_events configuration options.
The logger option defines the command used to record log messages.
For example:
$ module config logger "/usr/bin/logger -t modules"
The logged_events option defines which module events are recorded.
Event |
Description |
|---|---|
|
Record module commands requested by users. |
|
Record modulefile evaluations requested by users. |
|
Record modulefile evaluations automatically triggered by Modules. |
Multiple events may be specified using the : separator.
For example:
$ module config logged_events requested_cmd:requested_eval
By default, no events are logged.
The logger command can be customized to integrate Modules activity with an existing logging or monitoring infrastructure.